Wednesday, November 6, 2013

DDCC DT Designer In The Spotlight


Good morning again my lovelies.
Wow, a new post each day for the last few days.  Things are looking up lol.

Today I am here to announce the Design Team Winner for
Designer In The Spotlight :)


We have all had a lot happen this last month but our Design Team is really strong & our focus being on our DDCC projects.  We are all amazed with how our friendships have formed since we started this fantastic little adventure &  it is very much like a family environment that we all love.  

Thank you to the DT ladies for giving all their heart in completing all the challenges set forth to them.  You have conquered them all with flying colours & I am so proud to have you part of the team :)  Way to go ladies & thanks so much from the bottom of my heart for helping me make DDCC a success.


Each month we all nominate just one DT member to win the Spotlight.
This can be down to their interaction in the group, offering help to others, promoting DDCC & even down to how they did with their last challenge.  There are many elements that go into play for reaching our decision & of course we would love to nominate them all.  However, there can only be one winner.


The winner will be rewarded & win the following:
- To be featured on Dreamtime Designs blog for the month.
- A DT Sisier In The Spotlight blog badge
- WIN a AU $20 Voucher from any online shop of their choice.


The DDCC DT In The Spotlight Winner is...

....


....


Congratulations Emmey :)  You really deserve this hun.  
Here are some of the reasons that were given for your nomination:

- Your design with Challenge # 2 was great & your results were fab
- Your tutorial was enjoyable & easy to follow
- Your humour and participation in our DT Facebook group
- A constant source of inspiration & motivation
- You are always getting us involved & motivated in the group
- You keep us all in check & ask us for advice when needed
- A happy-go-lucky little Smurfette who doesn't mind getting her hands dirty (with blue ink)
-  You make us laugh till our sides hurt


Thank you so much Emmey for your participation & inspiration at DDCC.
We all love your commitment to the team & thank you for it :)

Please go visit Emmey's blog & give her your best wishes.
I know she would luuurrrve to hear from you :)
You can do that here.


Thank you to the rest of the ladies in the Design Team for your nominations.
Maybe it will be YOU next month :)


Don't forget to have a go at our very unique challenge at DDCC
We would love to see your creations & you could Win $20 cash! 
Hope to see you there :)


Big hugs xxx


Thank goodness for social media :)  Feel free to keep up with me :)
Facebook - I hold regular giveaways & discounts on my designs - Click here
Twitter - Tweet tweet - Click here
Pinterest - Yes I'm addicted lol - Click here


Follow on Bloglovin


Tuesday, November 5, 2013

Winners Of Challenge #1 @ DDCC :)


Good morning :)
It is a dull dreary & rainy day today so it is the perfect time to do some crafting & designing :)


We only had two entries for Challenge #1 at
Dreamtime Designs Craft Challenge
but boy they were very impressive!


It was tough with choosing the winner as they were both brilliant.  We would have liked to have chosen both designs but we could only choose one.


Our Shining Star Winner of Challenge #1 is:
Mrs. A


We love how Mrs. A has taken a place that is very special to her & created a replica of it beautifully into a smaller paper craft world.  The detail is absolutely amazing!  

Congratulations Mrs. A :)  
Feel free to take your badge & please contact me using the contact form on the sidebar with your PayPal details so that you can claim your winning prize of AU$20.


------------------------------------------------------------


Our 1st Place Winner is:
KT Fit Kitty


This is truly a gorgeous design with an array of wonderful elements.
The story behind the project is truly adorable.

Congratulations KT Fit Kitty.


------------------------------------------------------------

Thank you so much for sharing part of your world with us & for entering the challenge.  It definitely wasn't an easy one & you both did a fantastic job :)


Have you all seen Challenge #2?  You can find it here.
We would love for you all to give it a go :)
Hope to see you there.


Big hugs xx


Thank goodness for social media :)  Feel free to keep up with me :)
Facebook - I hold regular giveaways & discounts on my designs - Click here
Twitter - Tweet tweet - Click here
Pinterest - Yes I'm addicted lol - Click here


Follow on Bloglovin


Sunday, November 3, 2013

Menu Board - My Besties Aussie Challenge


Happy Sunday everyone :)
I hope you are all having a wonderful weekend.


Today I am just popping in to show you my design for the 
My Besties Aussie Challenge which is:

Use Pearls

Pretty easy hey?


I decided to do something completely different.
But I of course needed to use a gorgeous Bestie first which you can find here.


I used the following Copic colours:

Skin: E0000, 000, 00, 11, 21, R20
Hair: E21, 25, 29, 50
Outfit: C0, 1, 3, G00, 82, 85, 94, B93, 95, 97,99, 
R22, 27, 29, YR00, 20, 31, Y17 
Blender


Want to pin the Copic colour combo?


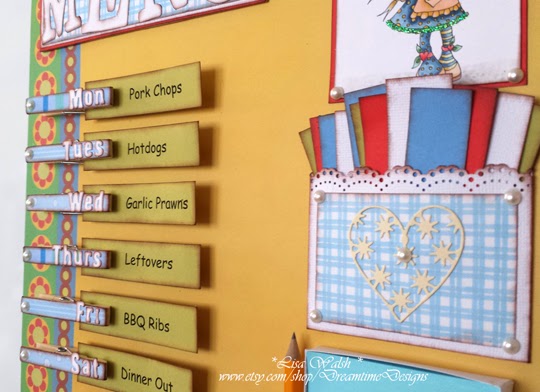
Each peg has the day of the week on it & the labels have different meals printed on them.  These can be moved around in accordance to when the meal is planned for the week.


There are spare labels in the pouch to write more meals on them.


There is a post-it note pad along with a pencil that can be used to write your shopping list in accordance to the meals planned for the week.


I had a lot of fun creating this menu board & I am definitely going to make more of them.  Not only does it help organise meals for the week but it also looks great on the fridge :)

This design will be going into my Etsy shop in a few days.


If you would like to pin this design to your Pinterest board:


-----------------------------------------


I would like to include my design into the following challenges:

Crafty Creations #246 - Make it yourself 
Charismas Cardz #43 - Anything but cards
ABC - Y is for Yellow
Whimsy Stamps #65 - Anything Goes


-----------------------------------------


Thank you so much for coming to visit :)


Don't forget to have a go at our very unique challenge at DDCC
We would love to see your creations & you could Win $20 cash! 
Hope to see you there :)


Big hugs xxx


Thank goodness for social media :)  Feel free to keep up with me :)
Facebook - I hold regular giveaways & discounts on my designs - Click here
Twitter - Tweet tweet - Click here
Pinterest - Yes I'm addicted lol - Click here


Follow on Bloglovin


Saturday, November 2, 2013

My Lightbox Tutorial - Challenge 2 @ DDCC


Good morning my crafty friends & followers :)
I hope you have all had a lovely week.

What do you think of challenge #2 at Dreamtime Designs Craft Challenge?
All of the DT projects are fantastic & we honestly cannot wait to see yours.
Today I would like to share my challenge project with you.


This month we are focusing on the Designer & her Craft Room.
You can find out more of the details on the original post here.


--------------------------------------------------------------------------
Dreamtime Designs Craft Challenge #2:
My Craft Room - Construct A Lightbox.
--------------------------------------------------------------------------

This challenge is all about creating a lightbox which will enable you to take better photo's of your designs & / or projects.  It will help you to eliminate items from the background & provide better lighting during your photo shoot.

* If you already have a lightbox that you have already created please try to remember how you put it together.  Use photo's where you can & follow the challenge as much as possible.  This applies even if you have purchased a store bought lightbox.


---------------


When you read the challenge description you will see how the challenge is to be set out like a tutorial while creating the lightbox.  I am so excited to share my take on the challenge with you for a few reasons.  This is my first attempt at a tutorial & I have been wanting to do one for some time but wan't quite sure what to base is around lol. Also, since starting my blog a few years ago I have had a lot of difficulty with photographing my designs & achieving the results I was hoping for.

My surroundings were always interfering & I was always having to move objects out of the way which was not only frustrating but also time consuming.  However, now that I have created my lightbox I am so impressed with how easy it was to create & how much difference it has made to the photo's of my designs.  The results are fantastic. The best thing of all it only cost me a few dollars to make :)


I am so happy that I am able to provide this tutorial so that it will give you some ideas of how you too can create one.  Not only that, if you enter it into our challenge you could WIN $20 Cash!  What a bonus!  Remember though, you need to be in it to WIN it.  Enter the challenge, have a lightbox at the end of it & also the chance to WIN some crafting cash :)  Perfect :)


Challenge Part A:
Do some online research about creating a handmade lightbox & decide which design will better suit you & your needs.

I did a bit of research, gained a little bit of extra insight but mostly just created the lightbox in a more simplified Lisa way :)  Many of the one's I looked at were quite different to what I wanted & needed.


Challenge Part B:
Create your lightbox taking step-by-step photo's as you go. Explain each step with how you are putting it together until you have completed your project.

I only moved house not that long ago & I decided to keep some of the boxes, just in case.  I am so glad that I did!  I grabbed the biggest box I had & knew it would be perfect for the lightbox that I wanted to create.

Although I had the box I couldn't work out what I was going to use for the inside.  Cardstock, tissue paper, paint it?  It only happened by chance when visiting my local hardware shop to get more hinges for my designs that I found exactly what I needed.  Corflute.  It was white, sturdy & perfect!

When I got home I gathered all of the supplies & materials that I would need to construct my lightbox.


Supplies Needed


1 Cardboard Box

1 Sheet of Corflute
Measuring Tape
A long ruler
Craft Glue
Pencil
Craft Knife


Step 1:

Decide on a cardboard box that you feel will be big enough to house your projects.


Step 2:
Cut off all side flaps with your cutting knife.
Once you have done that cut the front panel off too.
Your box should now look like this:


Step 3:
Measure up your corflute to the size of each side panel & the bottom of the box.  When you are satisfied that you have it right, use your pencil & ruler to mark where you need to cut.  Then cut the corflute in accordance to your sizing & markings.


Your box should now look something like this:


Step 4:
When you are very happy with the correct sizes of the panels & they fit properly, take your glue & adhere each panel to the box. I started with the bottom first, then the back & then the two sides.


Step 4:

I also used clothes pegs to hold the panels in place whilst drying. You could also put some books on the bottom panel too if you like just to give it that extra weight for the glue to bond better.  I used magazines :)


Step 5:

When the glue has set & you are happy with stability of the insides, simply take off the pegs & remove your books (or magazines).  Your lightbox is now complete :)


I generally take my photo's outside so I am not in any need of indoor lighting at this point in time.  However, if I do end up adding lights etc, I will be sure to update this tutorial to let you know the changes I have made to my lightbox.  Stay tuned :)


Challenge Part C:
1) Take a photo of one of your designs without the lightbox as you would have done before you created it. This is your 'before' photo.
2) Take another photo of the same design but this time inside your lightbox. This is your 'after' photo.


This is my before shot of this design without using a lightbox.


This is my after photo - using the lightbox.


Challenge Part D: 
Explain your experience including:
1) Has the lightbox helped you?  If so, how?
2) Are you using the lightbox inside the house or outside?
3) Are you using lights?  If so, what kind?
4) Tell us two tips or tricks about creating or using a lightbox.

I had a great time putting the lightbox together & it has definately helped me in many ways.  I no longer have to worry about my surroundings, what is in the way & what is in the background of the photo.  All I have to do is grab the lightbox & take it outside to begin my photo shoot. The greatest thing I have found is that my pictures are a lot clearer & brighter.  The lightbox creates the perfect white background for every single photo.


Tips & Tricks
- When storing your lightbox put a sheet over the top to prevent dust & dirt making marks on it.
- Store in a dry place to prevent the box from getting damp otherwise the box will become limp.


I am really looking forward to using my new lightbox from now on.  I would greatly encourage you to try making your own as you will be amazed with the results.  Come & join us in the challenge here.


********************************************************


JOIN THE DDCC FACEBOOK GROUP
Want to chat about the challenge, share ideas & make some friends? 
Come & join in on the conversations in our new Facebook group. 
You can join here.


********************************************************


Thank you so much for popping in.
I will look forward to seeing you in the challenge.

Big hugs xxx


Thank goodness for social media :)  Feel free to keep up with me :)
Facebook - I hold regular giveaways & discounts on my designs - Click here
Twitter - Tweet tweet - Click here
Pinterest - Yes I'm addicted lol - Click here


Follow on Bloglovin


Friday, November 1, 2013

Challenge #2 at DDCC :)


Hello our lovelies :)

We may have only had two entries to our challenge last month but WOW they were & are fantastic!  Have you been over to check them out?  

These wonderful ladies have taken the challenge by the horns & ran with it & their results are excellent!  It has been great getting to know each designer a little more just through the challenge itself.  Thank you ladies for doing such a brilliant job :)  We are going to find it sooo difficult to nominate a winner but we will let you know who that is very soon :)  

Thank you so much for participating & we hope to have a few more of you participating in this challenge :)


DID YOU MISS OCTOBER'S CHALLENGE?
Not to worry, you can still enter :)

All of our previous challenges will be re-opened so that you can try them out at any time you like. For every single previous challenge you complete, you will be entitled to win the DDCC Conquered Badge :)

Would  you like to try your hand at Challenge #1 - You can still enter here.


********************************************************


It's November & it's time for another
Dreamtime Designs Craft Challenge.

Before I tell you what the theme is, let's see what you can win :)


Our Shining Star Winner will
WIN $20 CASH
(Australian Dollars via PayPal)


Our Top 5 will be carefully selected in order of 1st, 2nd, 3rd etc, by our DDCC DT ladies.  
A Top 5 badge will be awarded in recognition to the winning places. 


We reward ALL those who participate & complete our challenges with a DDCC Conquered badge.  All you need to do is enter the challenge :)

This is the badge for when you complete Challenge #2


At Dreamtime Designs Craft Challenge everyone wins something.
We believe YOU deserve the recognition of all the hard work you put into your project :)


********************************************************


What is the theme focus this month?
Your Craft Room

This month we have a wonderful challenge for you.  It is based around you, the Designer & the focus being on your craft room.  We hope it will help many of you in regards to your photography environment when taking photo's of your gorgeous creations. 


--------------------------------------------------------------------------
Dreamtime Designs Craft Challenge #2:
My Craft Room - Construct A Lightbox.
--------------------------------------------------------------------------


This challenge revolves around creating a lightbox which will enable you to take better photo's of your designs & / or projects.  It will help you to eliminate items from the background & provide better lighting during your photo shoot.

* If you already have a lightbox that you have already created please try to remember how you put it together.  Use photo's where you can & follow the challenge as much as possible.  This applies even if you have purchased a store bought lightbox.

Please note: The questions are to be included & are an important part of the challenge. They need to be added to your challenge blog post along with your answers.


Challenge Part A:
Do some online research about creating a handmade lightbox & decide which design will better suit you & your needs.  Use your research as a guide / reference & remember to give credit (if needed) in your challenge post.


Challenge Part B:
Create your lightbox taking step-by-step photo's as you go. Remember to explain each step with how you are putting it together until you have completed your project. It would also be a good idea to include a list of the supplies you have used.


Challenge Part C:
1) Take a photo of one of your designs without the lightbox as you would have done before you created it. This is your 'before' photo.
2) Take another photo of the same design but this time inside your lightbox. This is your 'after' photo.


Challenge Part D: 
Explain your experience including:

1) Has the lightbox helped you?  If so, how?
2) Are you using the lightbox inside the house or outside?
3) Are you using lights?  If so, what kind?
4) Tell us two tips or tricks about creating or using a lightbox.


I hope that this challenge & completed lightbox will be a great help to you.
Remember, try not to feel too intimidated by the challenge.  Simply break it down & concentrate on one step at a time.  Before you know it, you have conquered our challenge :)  We are looking forward to you joining us & having some fun :)


--------------------------------------------------------------------------


Here are the DDCC Design Team & their projects :)

You will notice that there is only a sneak peek so you will need to click on the image which will take you to their blog to see their completed project.  Don't forget to leave a comment on their challenge post as they have worked extremely hard on their projects & they would love to know what you think on their take of the challenge.

All of the DT ladies have come up with different lightboxes so we hope that we inspire you :)


Dreamette Sam


Dreamette Cindy


Designette Emmey


Dreamette Julie


Dreamette Roberta


Designette Joanne


Dreamette Mikha


Lisa


Woo hoo :)  So what do you think?  We hope that we have provided some wonderful inspiration for you :)  It's your turn now & we can't wait to see what you have create :)


--------------------------------------------------------------------------


Challenge Guidelines:
Who can enter: Anyone
Specifications: You must have a blog
Number of entries:  Only one entry per person is allowed
Deadline: 30th November (Australian Timezone)

(To see the complete rules & guidelines click here)


********************************************************


JOIN THE DDCC FACEBOOK GROUP
Want to chat about the challenge, share ideas & make some friends? 
Come & join in on the conversations in our new Facebook group. 
You can join here.


********************************************************


Are you up to the Dreamtime Designs Craft Challenge?
Enter your challenge project below with our wonderful Mr Linky :)
(If in the event that Mr Linky isn't working please submit your entry blog link to the comments section below).


Good luck & don't forget to have fun with this challenge.
Enjoy the journey :)


Take care & see you back here tomorrow as I will be sharing my project & take on the challenge.  Thank you very much for visiting.

Big hugs xx


Thank goodness for social media :)  Feel free to keep up with me :)
Facebook - I hold regular giveaways & discounts on my designs - Click here
Twitter - Tweet tweet - Click here
Pinterest - Yes I'm addicted lol - Click here


Follow on Bloglovin